
Version 6.04a1 Build 048
SSAP 9.92 • U-value
General Help - SAP, U-value and PV & Wind Turbine modules
4. Creating a company logo and adding to JPA Designer
The outputs from JPA Designer can be customised to include your company logo. There are three steps to adding the company logo to print outs or PDF files:
- Convert the logo file in the right format.
- Save the logo file in the JPA Designer folder.
- Set the JPA Designer program options to find and use the logo.
Converting the logo file to the right format:
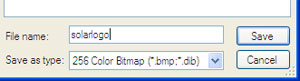
JPA Designer can only use a logo file which is a 256 colour BMP (bitmap) file. If you only have the logo in a format such as JPEG or TIFF you will have to convert the file to the BMP format. The simplest way to do that is to ask the graphic designer who prepared the original logo to supply a 256 colour BMP.
 Alternatively, you can convert the logo yourself using tools such as Microsoft Office Picture Manager, or MSPaint.
If you use MSPaint, make sure you set the file type to 256 Color Bitmap when saving the file.
 Saving the logo file in the JPA Designer folder:
The logo file must be in the JPA Designer folder, otherwise the program will not find it. For a standard installation the logo must be saved in the folder (see right):
> (C:)
> Program files
> JPATL
> JPA Designer 981
5. Setting location for logo and adding company details
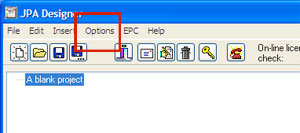 Output options in JPA Designer are set using the Options menu in the Project Manager window; you must set the program to include the logo in the print out and set the name of the logo file.To do this:
- In the Project Manager window select Options from the menu bar. The Options dialogue opens.
 The Options dialogue has four tabs.
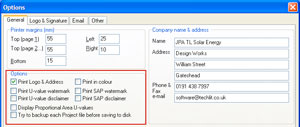
In the General tab, tick Print Logo and Address and Print in colour. Type in the company name and address if you want them to appear on the output.
- Click on the Logo & Signature tab.
There are now four boxes to complete
in the Logo position (mm) section.
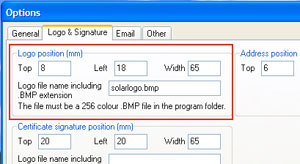 Use the Top and Left boxes to set the position of top left-hand corner of the logo on all pages: measurements are in millimetres (mm). Remember these distances as you will be setting the page margins later.
- Use the Width box to specify how wide the logo will appear on the page: the measurement is in millimetres (mm). JPA Designer will scale the logo to match the specified width.
- Enter the name of the logo file in the box 'Logo file name including .BMP extension'.
Note: in the example, that would be solarlogo.bmp, not solarlogo
and not c:/Program files/JPATL/JPA Designer 981/solarlogo.bmp.
- Click OK.
The next time you print or create a PDF the logo will be displayed on the print out. You will probably need to experiment with the Top, Left and Width settings to get the logo to appear in the right place and at the right size.